Jahanikia NeuroLab

fMRIPrep & BIDS
Author: Mounami Reddy Kayitha
What is fMRIPrep?
fMRIPrep, a Nipreps application, was developed as a functional magnetic resonance imaging preprocessing pipeline to help analyze task-based and resting-state fMRI images. fMRIPrep utilizes tools from FreeSurfer, AFNI, FSL, ANTS, and other preprocessing tools to:
Take fMRI data from raw to fully preprocessed form.
-
Implement tools from different software packages.
-
Optimize data processing
-
Preprocessing quality reports
-
Thorough output of preprocessing stages + errors
-
Automate + parallelize processing
Before we can install fMRIPrep, we first need to understand what BIDS is, as fMRIPrep requires the data to be organized in BIDS format.
What is BIDS?
Neuroimaging is a complex field, with millions of minds all working together to explore the various facets of the brain. But with the intelligence of millions of minds comes the chaos as well. Neuro-imagers have long tried to create a standardized system to organize neuroimaging data. But nothing ever became truly standardized.

BIDS is that 15th standard. Well, not really but it's a really close accepted format even if it isn’t the standardized one. BIDS or Brain Imaging Data
Structures is an organizational structure to organize, annotate, and describe neuroimaging data, with a folder system and respective JSON files containing metadata (data with information about other data). The purpose of BIDS is to make it easier for researchers to format for data so it's easily accessible and understandable for others. A short list of the other benefits of BIDS are:
-
Same Vocabulary
-
Reproducibility
-
Easy to Share
-
Organized
-
Systematic
-
Applicable to Software
-
Easy to Adopt
-
Simple Structure
BIDS Origins:
BIDS was a collaborative project that started at a Stanford Lab in January 2015. Originally run by Chris Gorgolewski, the project is now spearheaded by a Steering Group, Franklin Feingold, Stefan Appelhoff, Chris Markiewicz, and Stanford’s Poldrack Lab (https://en.wikipedia.org/wiki/Brain_Imaging_Data_Structure). BIDS was inspired by the format used in OpenfMRI (now OpenNeuro.org).
BIDS Specification Guidelines:
In order to convert to BIDS format, we need to follow the BIDS specifications guidelines that clearly document the formatting rules.
-
Go to: https://bids-specification.readthedocs.io/en/stable/.
-
Click on the embedded link on the page: downloaded as PDF (or go straight to https://zenodo.org/record/6094534#.Yp6OEOzMK3I).
-
Download the BIDS Specification Guidelines
I would recommend familiarizing yourself with the table of contents at the very least so that you can easily identify what guidelines are present and where you can find them.
BIDS Conversion:
Here's a brief set of instructions to convert to BIDS format.
MRICroGL Installation:
First things first, you need MRICroGL to be able to begin converting your data to BIDS. MRICroGL converts DICOM files to Nifti files and produces an accompanying JSON file.
To download MRICroGL: https://www.nitrc.org/projects/mricrogl/
Reminder: Make sure the version you are downloading is for your specific system.
Note: You may need to create an account to download.
MRICroGL Usage:
Once downloaded, launch MRICroGL. You should be greeted with a screen that looks similar to this::

Now locate the import menu and click 'Convert DICOM to NifTI':

This will bring you to a new page:

In this new page:
-
Under Output Directory: Change the location to where you wish your converted files to go.
-
Under Create BIDS Sidecar: Make sure the option is set to ‘Yes, Anonymized’
-
Drag and drop files/folders that you wish to convert (should be all of the folders in the data set which have DICOM data).
-
Optional: You may delete the DICOM data if you feel you have no need for it.
BIDS Conversion:
-
Create a folder for your data (typically with the BIDS label somewhere in the title).
-
Create description_dataset.json file using https://jsoneditoronline.org/#right=local.hevino, according to the BIDS Specification guidelines
-
Create a folder hierarchy based on the BIDS Specification guidelines.
-
Files should then be renamed according to the BIDS Specification guidelines and the folder hierarchy they are under.
-
Utilize the BIDS Validator () to check for errors and fix them accordingly to ensure that the BIDS format is strictly upheld.
Note: this is not a thorough explanation of BIDS conversion, as the guidelines (located here: https://bids-specification.readthedocs.io/en/stable) provide a far more thorough explanation for general formatting and specific cases as well).
-
docker run hello-world (should give a message from docker tutorial page itself)
-
Close and reopen docker to see hello-world under “images”

fMRIPrep Installation Steps:
Installation Video: https://drive.google.com/file/d/1pms5xfTsCX_wfPVjQYN9K-Bx8dHg8zcz/view?usp=sharing
Docker-Interactive Installation
(https://www.youtube.com/watch?v=MU8HUVlJTEY&t=611s):
-
Install Docker (enter any passwords asked, etc.) (Choose download for respective processing system: https://docs.docker.com/desktop/mac/install/)
-
The link also has a command line method to install docker if so preferred
-
Should see the Docker icon at the top of the screen (upper right)
-
Next Validate Install:
-
Click on icon and should see a Docker Desktop is running message
-
In Terminal or Command Prompt:
-
docker (command should give you features of docker)
-
docker run hello-world (should give a message from docker tutorial page itself)
-
Close and reopen docker to see hello-world under “images”
-
-
fMRIPrep Installation(https://andysbrainbook.readthedocs.io/en/latest/OpenScience/OS/fMRIPrep.html#fmriprep-installation-option-2-docker)
-
which pip
-
If pip is not installed: for installation steps, go to https://andysbrainbook.readthedocs.io/en/latest/OpenScience/OS/BIDS_Overview.html
-
python3 -m pip install fmriprep-docker
-
When you run it again, it should just list the file path that fmriprep-docker is in
-
-
echo ‘export PATH=$PATH:/path of where fmriprep-docker is located' >> ~ /.bash_profile
-
Such as: echo ‘export PATH=$PATH:/Users/mkayitha/.local/lib/Python3.9/site-packages’ >> ~ /.bash_profile
-
-
source ~ /.bash_profile
-
FreeSurfer License
Get a (free) FreeSurfer License (https://surfer.nmr.mgh.harvard.edu/registration.html) in order to be able to use FreeSurfer tools when running fMRIPrep.
Note: You do not necessarily need to fill in all of the information in order to get the license, but preferably as much as possible.
Note: Save the license and note down the path for later.
fMRIPrep Preprocessing Basic Script:
(https://andysbrainbook.readthedocs.io/en/latest/OpenScience/OS/fMRIPrep.html#fmriprep)
#!/bin/bash
#User inputs:
bids_root_dir=$HOME/BIDS_fMRIPrep/BIDS
subj=01
nthreads=4
mem=20 #gb
container=docker #docker or singularity
#Begin:
#Convert virtual memory from gb to mb
mem=`echo "${mem//[!0-9]/}"` #remove gb at end
mem_mb=`echo $(((mem*1000)-5000))` #reduce some memory for buffer space during pre-processing
export TEMPLATEFLOW_HOME=$HOME/.cache/templateflow
export FS_LICENSE=$HOME/BIDS_fMRIPrep/derivatives/license.txt
#Run fmriprep
if [ $container == singularity ]; then
unset PYTHONPATH; singularity run -B $HOME/.cache/templateflow:/opt/templateflow $HOME/fmriprep.simg \
$bids_root_dir $bids_root_dir/derivatives \
participant \
--participant-label $subj \
--skip-bids-validation \
--md-only-boilerplate \
--fs-license-file $FREESURFER_HOME/license.txt \
--fs-no-reconall \
--output-spaces MNI152NLin2009cAsym:res-2 \
--nthreads $nthreads \
--stop-on-first-crash \
--mem_mb $mem_mb \
-w $HOME
else
fmriprep-docker $bids_root_dir $bids_root_dir/derivatives \
participant \
--participant-label $subj \
--skip-bids-validation \
--md-only-boilerplate \
--fs-license-file $HOME/BIDS_fMRIPrep/BIDS/derivatives/license.txt \
--fs-no-reconall \
--output-spaces MNI152NLin2009cAsym:res-2 \
--nthreads $nthreads \
--stop-on-first-crash \
--mem_mb $mem_mb \
-w $HOME
fi
*Note: This code was obtained from Andy's Brain Book (https://andysbrainbook.readthedocs.io/en/latest/OpenScience/OS/fMRIPrep_Demo_2_RunningAnalysis.html) and only slightly modified based on potential user preferences, as a base script to utilize to start preprocessing. The script will complete standard preprocessing steps including coregistration, normalization, and physiological component extraction
fMRIPrep Preprocessing Steps:
The method to run the script is relatively simple, with only a few minor tweaks to the script as detailed in the proceeding steps:
Folder Hierarchy:
First, create a folder hierarchy system to organize all data.
-
Create the main folder for all the related data and preprocessing data to go into.
-
Create a subfolder for the code named ‘code’ (for simplicity).
-
Move the BIDS organized data to the folder.
-
Create a subfolder titled ‘derivatives’ in the BIDS folder system.
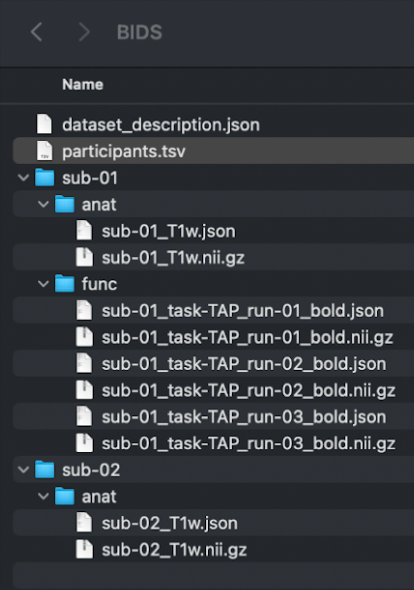
The folder should look similar to this:
FreeSurfer License:
Now, to move the FreeSurfer license to the 'derivatives' folder
-
First identify the path of your FreeSurfer license (you should have noted it down).
-
Next, open your Terminal or Command Prompt.
-
Ensure you are in the bash shell (change to bash shell if required).
-
Enter the following command prompts to move the license to the created ‘derivative’ folder
mv [path-of-license-file] [path-of-derivatives-folder]-
Note: Where it says [path-of-license-file], input the path of the license file.
-
Note: Where it says [path-of-derivatives-folder], input the path of the ‘derivatives’ folder where you want the FreeSurfer license file to be located
-
(such as: mv ~/Downloads/license.txt ~/Desktop/BIDS_fMRIPrep/BIDS/derivatives)
-
-
Create and Edit Script File:
-
Enter the following command prompts to create and edit the file for the script.
-
touch [path-for-code-folder]/fmriprep.sh
-
Note: Where it says [path-for-code-folder], input the path of the ‘code’ folder where you want the fmriprep.sh script to be located (such as: touch $HOME/Desktop/BIDS_fMRIPrep/code/fmriprep.sh).
-
-
vim [path-for-fmriprep.sh]
-
Note: Where it says [path-for-fmriprep.sh], input the fmriprep.sh path (such as: vim $HOME/BIDS_fMRIPrep/code/fmriprep.sh).
-
-
-
You have now opened up the fmriprep.sh file to be edited.
-
Press ‘i’.
-
Paste the script into the file.
-
Where it says bids_root_dir under the block of code commented #User inputs: , set the variable to the path of the folder system for where you want your data to go to (for ex: $HOME/BIDS_fMRIPRep/BIDS)
-
Where it says fs-license-file under the Docker if-else block of code, input the FreeSurfer license path (such as: $HOME/BIDS_fMRIPRep/BIDS/derivatives/license.txt)
-
Press ‘esc’.
-
Type ‘:wq’ to save and exit the file.
-
In the command line, type cat [path-for-fmriprep.sh] (such as: cat $HOME/BIDS_fMRIPrep/code/fmriprep.sh)
-
Note: You now should have the fmriprep.sh file in your derivatives folder. You may edit this file and change the code to add more specific parameters or processing steps or change the container. You may change the subj variable depending on which subject you wish to process.
Run the Script:
Enter bash fmriprep.sh in the command line to run the script
fMRIPrep Preprocessing Without Script:
Note: This command was derived from Stanford Center for Reproducible Neuroscience at https://reproducibility.stanford.edu/fmriprep-tutorial-running-the-docker-image/.
-
Enter fmriprep-docker [path-to-BIDS-data-folder] [path-to-derivatives-folder] participant --participant-label [participant label w/out ‘sub’ prefix] --fs-license-file [path-to-FreeSurfer-license-file]
-
Such as: fmriprep-docker ~/Desktop/BIDS_fMRIPrep/BIDS ~/Desktop/BIDS_fMRIPrep/BID/derivatives participant --participant-label 01 --fs-license-file ~/Desktop/BIDS_fMRIPrep/BIDS/derivatives/license.txtSuch as:
-
You may add additional arguments after the input, output, and analysis levels (https://fmriprep.org/en/stable/usage.html#command-line-arguments).
A Few, Basic Preprocessing Tools:
-
Inputnode (utility): Anatomy sub-workflow that constructs an average image of T1w images to RAS orientation and common voxel size, or averages group images
-
antsBrainExtraction.sh - Brain extraction
-
FSL fast - tissue segmentation
-
antsRegistration - spatial normalization
-
FreeSurfer mri_robust_template - merge multiple T1w images onto a single template
-
-
init_func_preproc_wf(): bold preprocessing
-
FSL mcflirt - estimates head motion
-
AFNI 3dTShift - slice time correction
-
Well, that's the end of this blog.
https://fmriprep.org/en/stable/usage.html#execution-and-the-bids-format is a valuable resource to use to look at all the other great features that fMRIPrep has and are soon to come!